PULSE: A Robotic Drummer
Attributes
Project Type: Team Project (CERAS)
Contributions: Creater, Lead Designer & Engineer
Duration: 7 months
Skills: Leadership, CAD, Embedded Coding, Electronics & Mechanical Design
Tools: Onshape, KiCAD, PlatformIO, Waterjet, Laser Cutter, 3D Printer, CNC
Preface
No one really questioned me when I first announced my plans for a robot drummer back in 2022, not with excitement, not with skepticism. At the time, starting my high school’s Creative Engineering and Robotic Arts Studio (CERAS) felt like just another move in the race to pad the Common App. PULSE, the robot drummer project, was just one more idea in the mix. I never imagined that four years later, I’d be working with ten passionate roboticists on PULSE and leading the club that now shares its name. So to everyone who’s contributed time, energy, or wisdom to PULSE and Northwestern CERAS: thank you.

Technical Overview
System
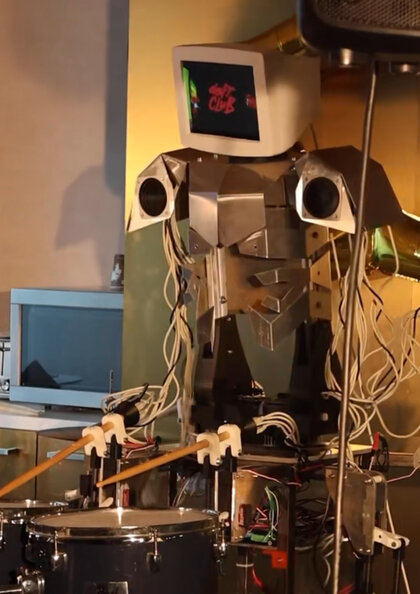
PULSE is essentially a Linux machine stuck to a MIDI signal interpreter stuck to a spiker-robot holding 6 drumsticks. A Raspberry pi 4 holds the firmware for the microcontroller, a folder full of MIDI files, and some software to sync the face of the robot (literally the monitor to the pi) to the music. The pi controls the “macro” aspects of the robot, like sending midi signals live to a microcontroller, which controls the “micro” aspects of the robot, like the actuators which actually strike the drums.

The microcontroller is a Teensy 4.1. It interprets the pi’s MIDI signals and controls a number of servos, stepper motors, and solenoid pistons, which combined, are responcible for all the robot’s movements. The combined flexibility of the pi and speed of the microcontroller puts PULSE at a sweet spot between precision and ease-of-use. A number of tuning mechanisms are also connected to the Teensy to allow for customizability of movement.

Mechanical
The mechanical side of the robot is rather simple. The mechanism for striking the drums, or “drummer unit” employs a serial manipulator with a single degree of freedom per arm. These arms are actuated by servo motors, all are capable of precise control of angle and speed and thus the tone and volume of each drum hit.

Two additional servo motors can also be found on the robot: one is for controlling the rotation of the head, and the other is to actuate the pedal of the hi-hat drum. The kick is actuated by two parallel-placed industrial solenoid pistons with PWM controls, too allowing for a good amount of volume control.

Torso & Head
The torso of the robot is actuated by three industrial stepper motors controlling two degrees of freedom. The rotation of the servo is actuated by a vertically placed stepper motor with a gear system that maximizes for precision and torque. This rotation is also aided by a custom designed ball bearing that reduces friction and allows for smooth rotation. The leaning of the torso is controlled in a similar manner using two horizontally placed stepper motors.

Aesthetically, PULSE looks as if it emerged from a pile of 80’s computer scraps. It’s arms are off-white USB cables tangled around eachother like vines in the jungle. It’s chest is a roughly hammered-together piece of sheet metal with a few bolts holding it together, above which sits a dusty CRT monitor for its head. Three speakers are also used for making robot noises during performance.

The Build
Parts List
Electronics
- Raspberry Pi 4
- 7” Raspberry Pi Touchscreen
- Teensy 4.1
- Teensy 4.1 Breakout Board
- Various Cables for pi and Teensy
- Various Wires
Actuators
- 6 AGFRC 23kg 0.055s High-speed Servos
- 3 NEMA23 Stepper Motors
- 3 Industrial Stepper Motor Drivers
- 2 24V 10A Industrial Solenoids
- 2 STP40NF10L N Channel Power MOSFETs
Power
- 24V 50A Power Supply
- 20A Adjustable Voltage Power Supply
Audio
- 2 50W speaker drivers
- 50W 8’ speaker
- 2 25W 4’ speakers
Hardware
- 12 10mm Diameter Bearing Balls
- 18 5mm * 10mm * 3mm Ball Bearings
- 18 5mm * 10mm set screw brackets
- 30’ of 1” Square Steel Tubing
- 2 12” by 30” by 1/16” Sheet Aluminum
- 18 Dysfunctional USB Cables
- Various M5 and M6 Nuts and Bolts
- Various 3D-printed Parts
Build Process
Now I highly doubt anyone whould try to replicate this project one-on-one, which is why this is mostly a chronicle of how we, Northwestern CERAS, went about PULSE’s construction. If you do feel like you want to exactly replicate PULSE, please contact me, because you are a strange fella and I want to know how it goes.